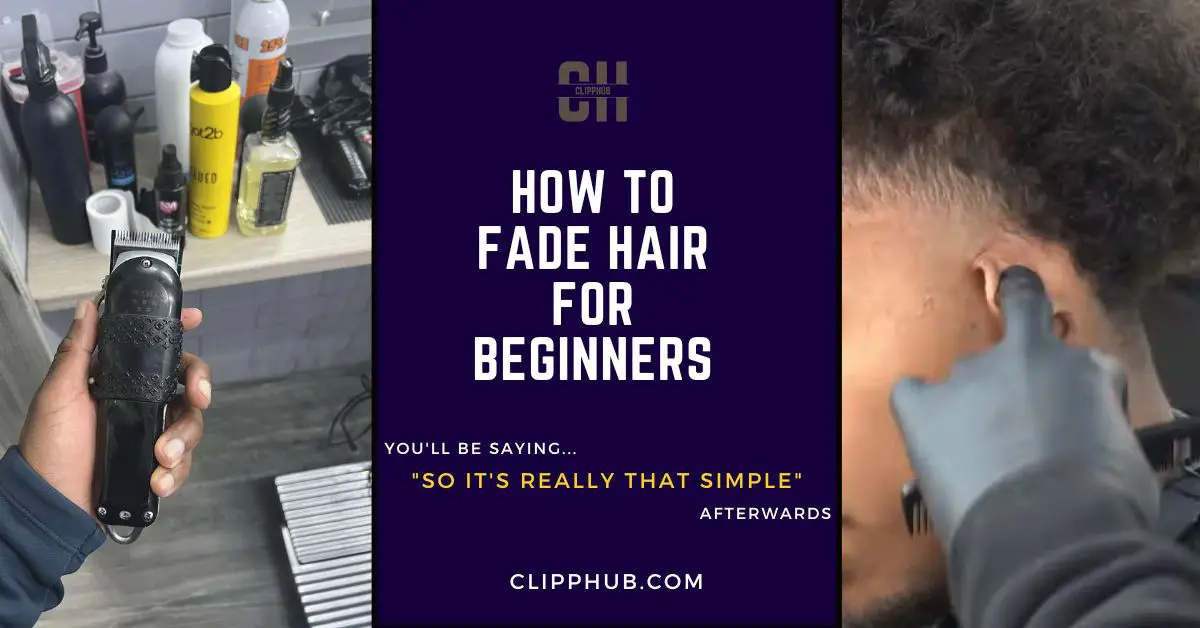
In this guide, you’ll learn how to fade hair for beginners at home.
If this is you, you’re in the right place.
In this guide, we’ll go through the lever, guard, and clipper and I’ll explain how they all work together to make a fade.
And… I’ll also provide the visual process of how to fade from my channel.
With that said, let’s get into it.
How to fade hair for beginners at home
Right to put yourself in the best position to fade hair, you need a clipper that well.. fades well.
In the guide below, I go through the best fading clippers article.
Best Clippers for Fades (Master The Art Of Fading)
Or if you want clippers better built for home use, check out this article on the best hair clippers for home use.
Best Hair Clippers For Home Use 2024: How to Choose and Use the Best Clippers
But, If you have a clipper right now, no problem, those will work too.
This guide will go through how to fade with a lever-based clipper.
Lever-based clippers have varying cutting lengths, and that all depends on whether they’re fade-blade clippers or taper-blade clippers.
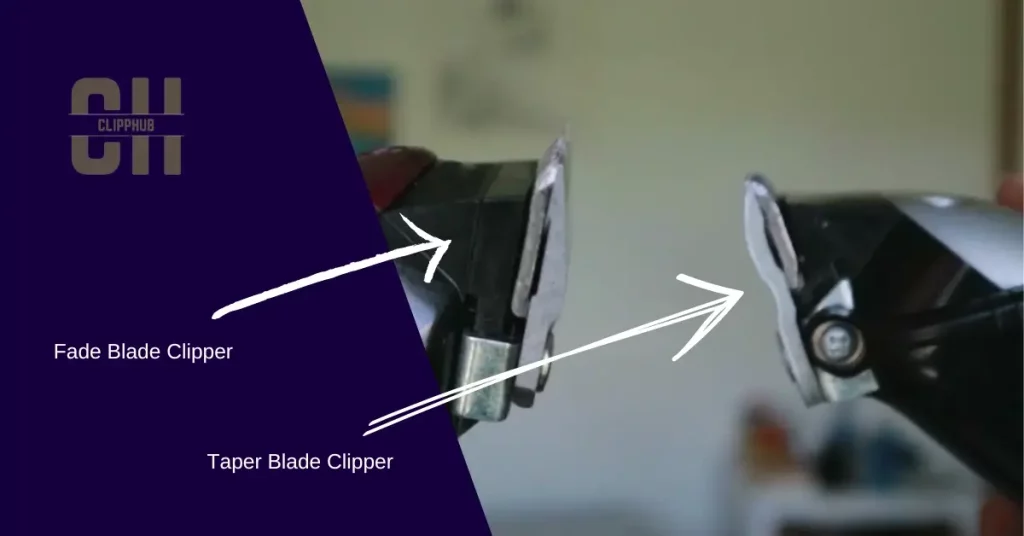
Each has subtle differences that affect the cutting length of the clipper.
You can read more into this in this guide:
How Much Length Does a Taper Lever Add? (Clipper Lever 101)
But regardless of what blade you have as long as you have an idea of the cutting length of the guard, you can always figure out the overall cutting length.
Take for example:
This gives you an overall cutting length of 4.5mm which, is basically a 1 ½ guard.
That’s an example we’ll get to later.
Detachable blade clippers work too, you just have to match the blade with the cutting length (I’ll speak more about this later).
Now let’s get into level-based clipper mechanics.
Don’t worry, it’s not that scary.
As a beginner, there are 3 parts to a lever you need to know.
That would be the:
- Lever closed
- Lever open
- Lever the lever being halfway between open and closed.
For the rest of this guide, I’m going to assume you have a fade blade clipper, that cuts to around 0mm when closed and 1.5mm when open.
That’s the most common cutting length and blade, so this may very well relate to you.
This is how your clipper looks when the lever is closed:
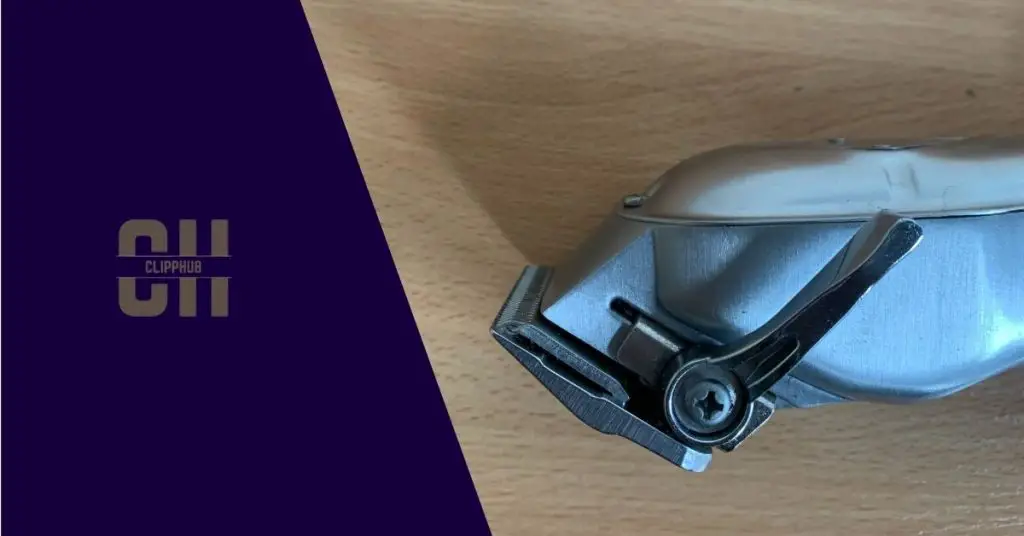
When your lever is closed it leaves about 0.1 – 0.25mm of hair depending on the clipper.
On the other hand, this is the lever open:
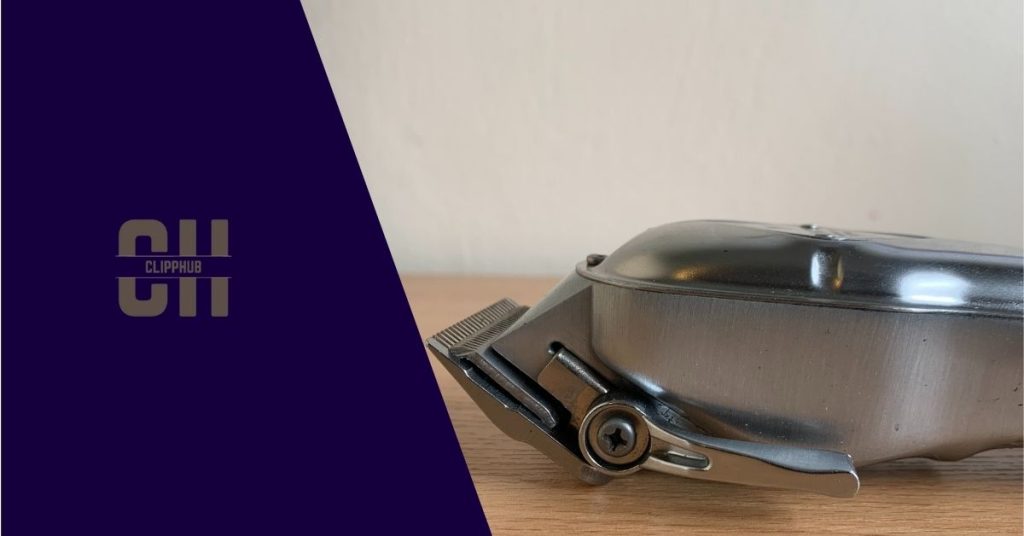
When your clippers are in this position, they leave more hair, 1.5mm of hair to be exact.
This is the same length as (half guard/0 guard) but we’ll get to guards later.
Extra:
Now if you were to zero gap your clippers, you can make your clippers cut more hair while they’re in an open/closed position.
If your clipper were zero gapped your clipper blades could cut as close to 0.0 mm when the lever is closed (basically the length of the trimmer).
Then when open, they would cut to about 1.2 mm.
So overall it’s a closer-cutting clipper.
If a very close cut is what you want, it may be more beneficial to you,
lever closed = 0-0.25 mm of hair left
Lever closed but zero gapped = 0mm of hair left
Lever open = 1.5mm of hair left
Lever open but Clipper is zero-gapped = 1.2mm of hair left
For beginners, I wouldn’t recommend zero-galling your clippers.
Clippers out of the box from a good brand will cut well.
But if you want more insight into this, you can read my guide on how to zero gap clippers.
Now that you understand the lever, it’s best you understand how clipper guards work so you can use both to get a clean fade.
Next up, understanding clipper guards.
How to use hair clippers for the first time
Now, if you need to know how the lever works. You now need to get the hang of the guards.
These are the guards of the 3 major brands and the lengths they cut to.
For beginners, I wouldn’t recommend zero-galling your clippers.
Clippers out of the box from a good brand will cut well.
But if you want more insight into this, you can read my guide on how to zero gap clippers.
Now that you understand the lever, it’s best you understand how clipper guards work so you can use both to get a clean fade.
Next up, understanding clipper guards.
How to use hair clippers for the first time
Now, if you need to know how the lever works. You now need to get the hang of the guards.
Wahl
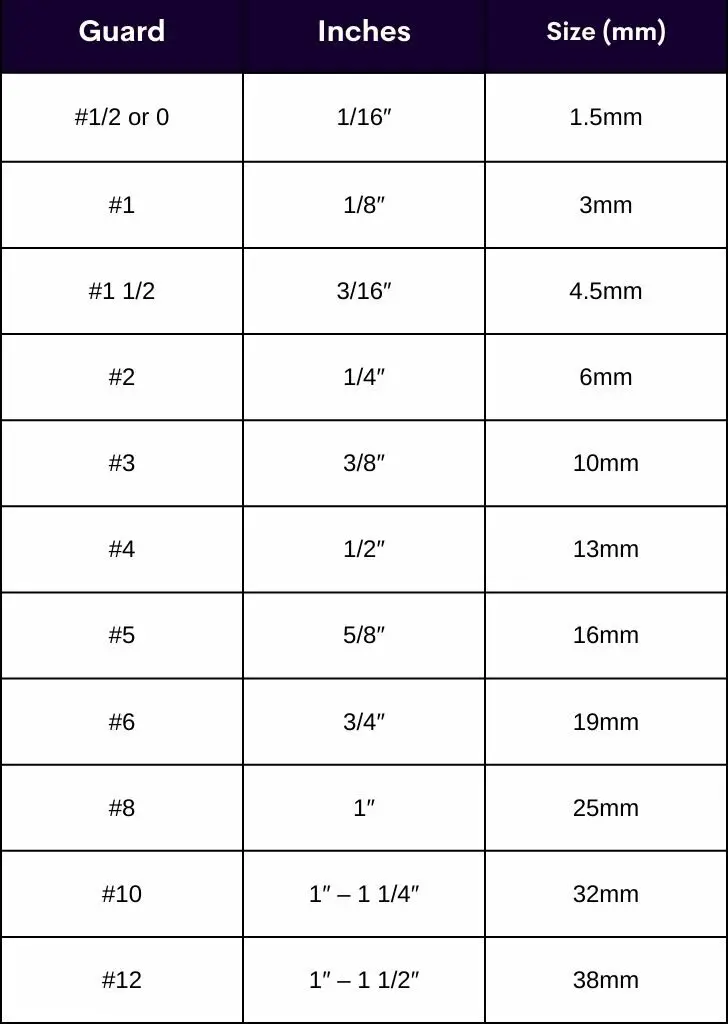
Andis
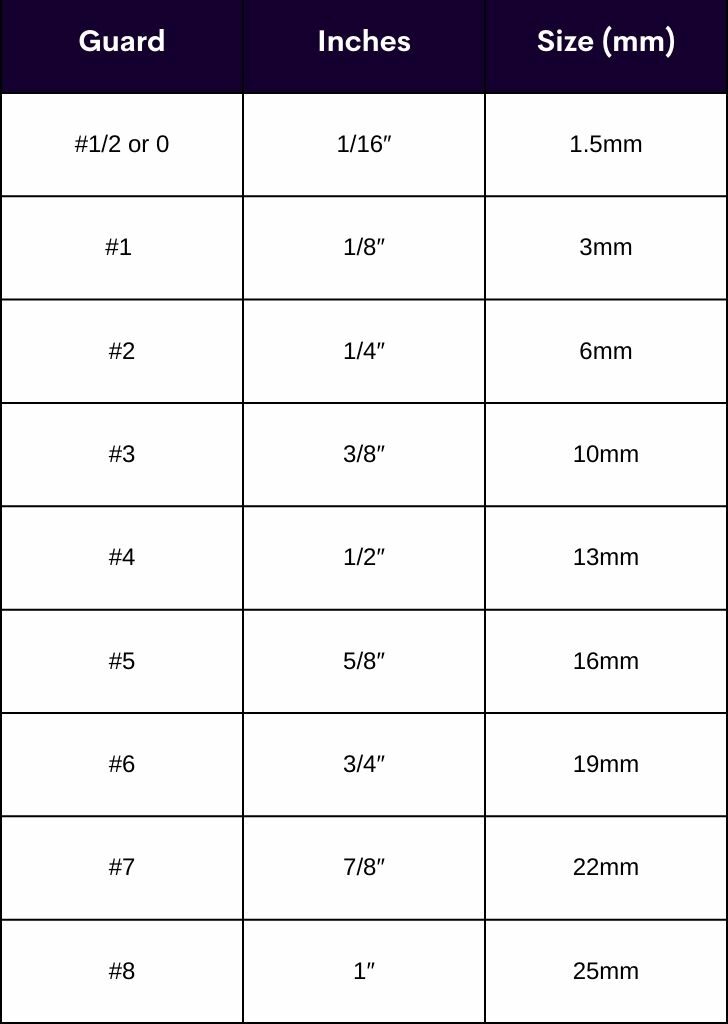
Babyliss
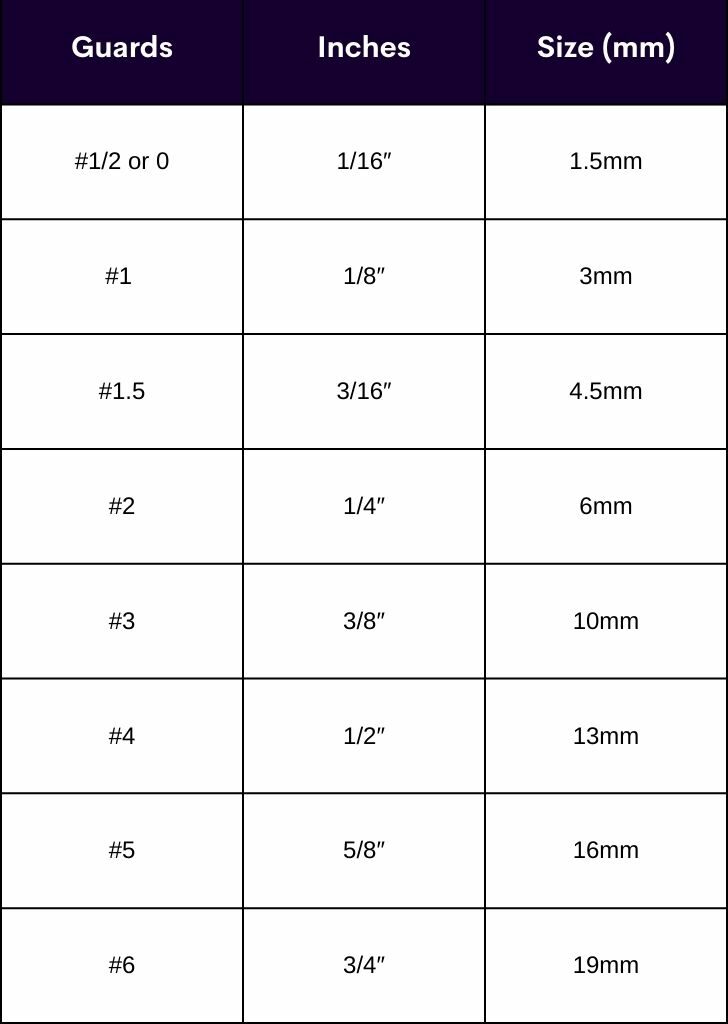
It’s best to think of the length in mm/ inches as how much hair is left.
So, you now know the lever moves to cut from virtually 0 when closed and 1.5mm when open.
And now you know guards leave a certain length of hair, well You can now use the two together to merge and equal out lengths.
Here’s an example:
Let’s say you had a #1 guard with the lever closed As you open your clippers lever, it will become a 1 ½.
Similarly, if you had a #1 ½ guard, lever open, as you close the lever the overall cutting length drops down to the actual 1½ guard cutting length.
See how you can have two different guards but depending on how you move the lever, they can come to cancel each other out?
Now I’ll explain it in terms of length.
With 1 ½ guard (4.5mm) and lever closed (0mm) = 4.5 mm of hair left.
This is the same as:
1 guard (3mm) and lever open(1.5mm) = 4.5mm of hair left which is a 1½ gaurd.
Alternatively
With a 1 ½ guard (4.5mm) lever open (1.5mm) = 6mm
Which is basically a 2 guard (6mm) lever closed (0mm) = 6mm
So that’s how you can manipulate the cutting level to reach the next guard up or down.
Now blades… (If you own a detachable blade clipper).
Blade vs guards
If you have a blade clipper, you won’t have a guard, instead, you should have a set of blades that cut to their exact cutting length.
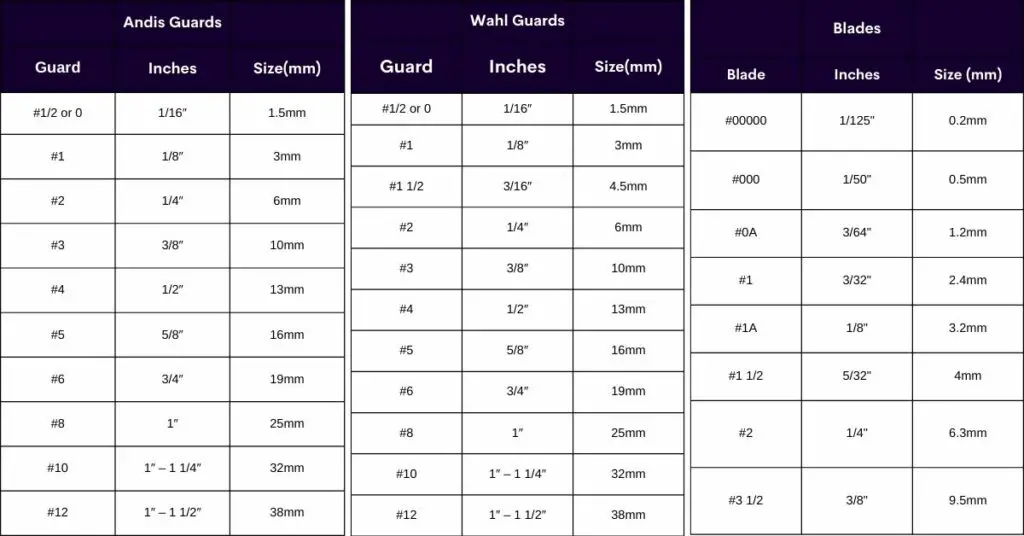
Blades cut to their exact cutting length, to get a new length you have to swap out the blade for the length you want.
Levers are more popular but as you can see, as you get down to the smaller lengths, you can seriously get some get detail with blades.
Hence at barber school, blades are what most barbers begin to cut hair with.
But if you have a lever clipper you can still get a very detailed cut Plus you don’t have to keep swapping out a blade, just move the lever!
Now go to the guide on how to fade hair at home If you’re a beginner, you’ll need to know about guidelines as you‘ll be using it to create lines that will blend into each other.
Guidelines
These are guidelines.
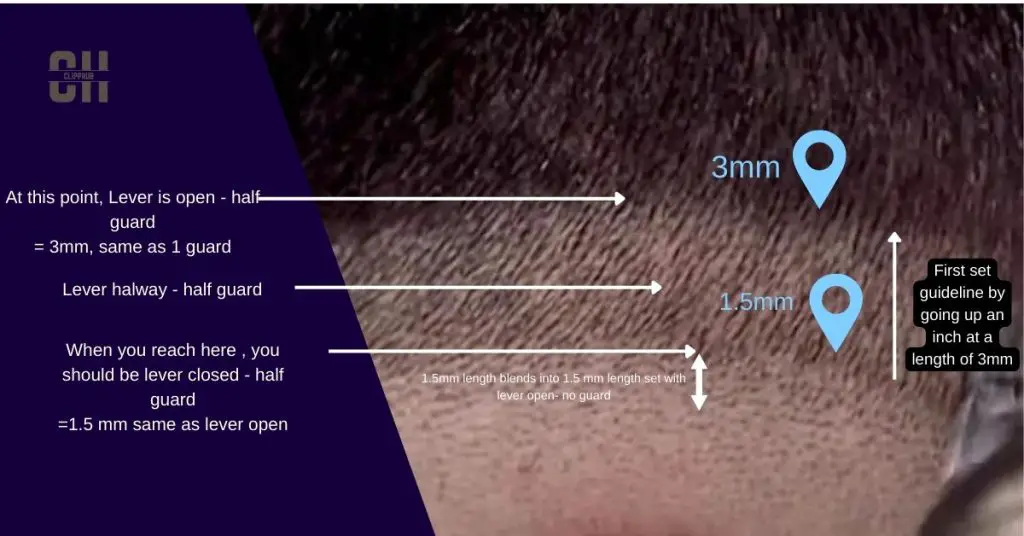
A guideline is an obvious and very harsh line created between different lengths of hair.
They are created when the length you clipper currently cutting, leaves more hair than the previous length below.
See how they steadily go up and each guideline gets thicker (has more hair)?
With guidelines, they are about an inch long (but that depends on the style), but the more space you make, the easier it is to blend… so don’t make them too cramped as you cut hair.
Starting bigger overall and longer cutting length, as you close your lever, you will gradually cut more hair.
While doing so, you should be taking out the guideline(fading it away), until you reach the bottom which will be the start of the new guideline.
So with that said, let’s get into how you can fade at home.
How to use a hair clipper for beginners
If you’re a visual leaner, here’s some of my work to show you how to create a taper fade:
Now to start off, you want to get a brush and brush your hair down so you work on a flat surface.
You don’t want any bumps.
Now. We get to work.
For these steps, we’re going to do a mid-fade.
We’ll be blending from a 2 ½ guard Lever open, down to a zero.
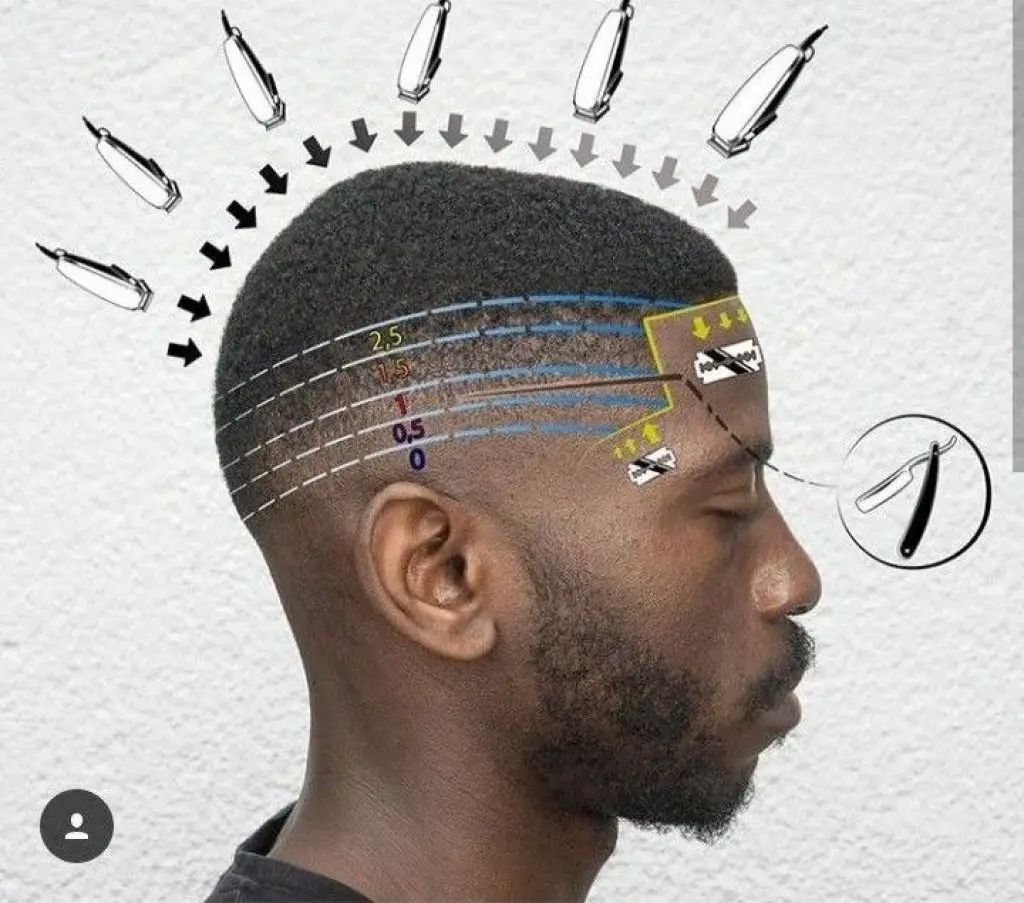
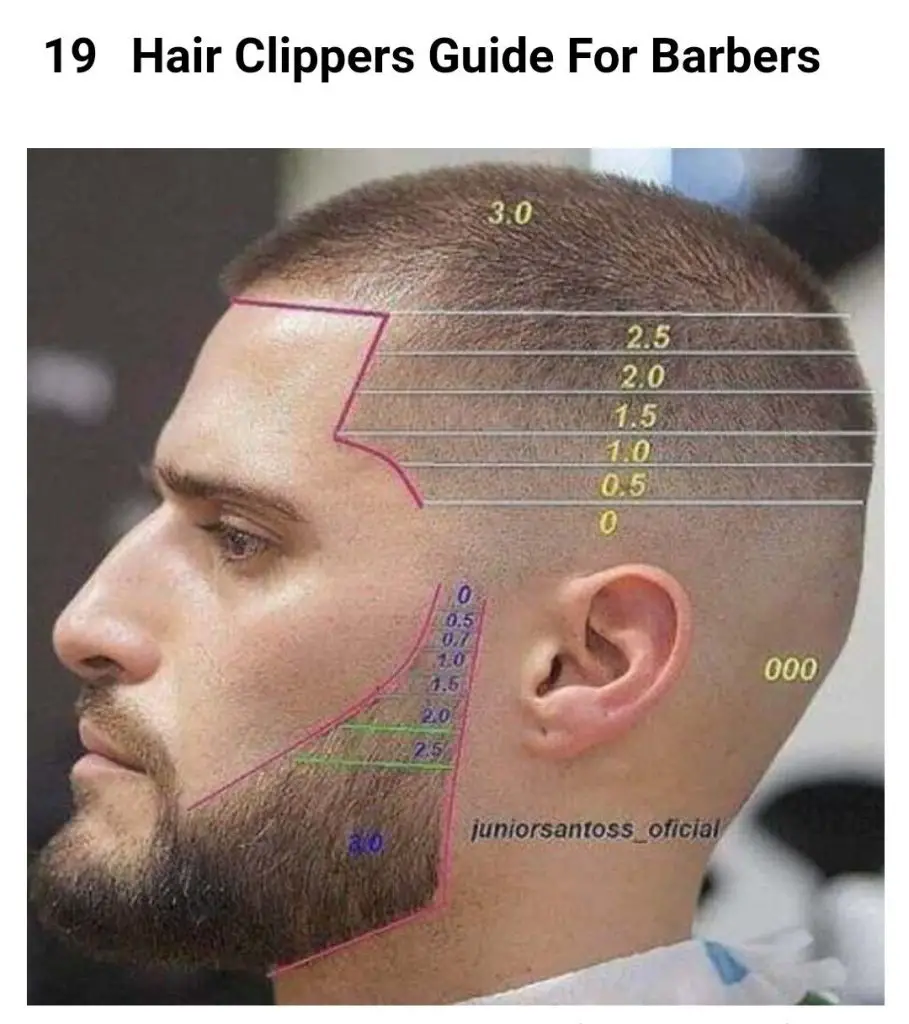
We will be using the same guidelines for this cut.
If your doing your own hair, I would suggest you use a barber mirror, it gives all the angles you need to look at when trying to create a smooth blend, you can pick one up from below:
Now as you go through each step, remember to keep brushing so you can better see each fade line as you create them.
2 guard lever open
So, get your 2 guards and open up the lever. This should give leave around 8mm of hair.
Take this and go over all the sides of your hair.
This should give an even flatter surface to work with.
Now, we can start the fading.
But first, you must set your first low guideline with your trimmers/line-up clipper.
Trimmer – no guard
The first step is to use the balders/trimmers/line-up clipper to set in the bald guidelines = 0 mm for the taper
Get your trimmer and set a line at the bottom of your hair go as down as you can as this will virtually cut all your hair off and will be the bottom part of your blend.
Set your clipper lever to open – no guard
The next step is to use the clippers with the lever fully open to set in the next guideline slightly further up about 1 inch.
You’ll notice as you do this there’s a slight difference between the guideline you set with your trimmer and the line you now created with your clippers ‘open’
You are leaving 1.5mm worth of hair, you’ll fade the two together next.
Set your clipper lever to midway – no guard
Now take your lever and set it to midway(that’s halfway between ‘open’ and ‘closed’).
Take your clippers and cut from the line you set with your trimmer.
Move your hand with delicate flicks and don’t go up the line you set with your lever fully ‘open’.
Now if you take your time and your blend well enough, you’ve blended the first part of your hair.
When you reach the bottom of that guideline, you should now have your lever fully closed which as we said earlier, is about 0-0.25mm depending on the clipper.
The length of hair left is enough for you to blend.
The lever is open- no guard line you made, should now be completely gone.(Faded)
And if you take your time and follow the process slowly, you should now have your first fade.
Success!!
(If you’re feeling confident, you can move the lever to be more closed or open and you can blend further) – It may not even be needed if you like the current look.
Now let’s go up.
Lever open + half-guard

Lever open + half guard is the same as 1.5mm + 1.5mm = 3mm which is basically a 1 guard now.
Go up an inch once more to create the new guideline which you’ll blend out.
Now, move the lever to halfway open.
Now you’re going to take out the lever open, no guard line you created.
This will now cut slightly more hair so slick at the line and it should start going away.
Now as you move down, by the time you reach that lever open line, your clipper should now be on a half guard, lever closed – 1.5mm + 0 mm which is the same as a lever open.
So when you reach that line you cutting the same length off your hair but you’ve now taken out a line of hair and done a fade.
Neat how it works isn’t it?
If you have your lever closed with any guard and you’re cutting the top side of your hair, you’ll be cutting more hair than you like and that’s how you botch a fade.
So Yh.. keep that in mind.
Now; this 0.5 cutting length is sometimes tricky and doesn’t always want to blend clean so what you could do is an attack from the other side.
You could remove the guard, take the corner of your clippers, open your level, and use the corner of the blade to attack the 0.5mm line.
Remember, there is the same length.
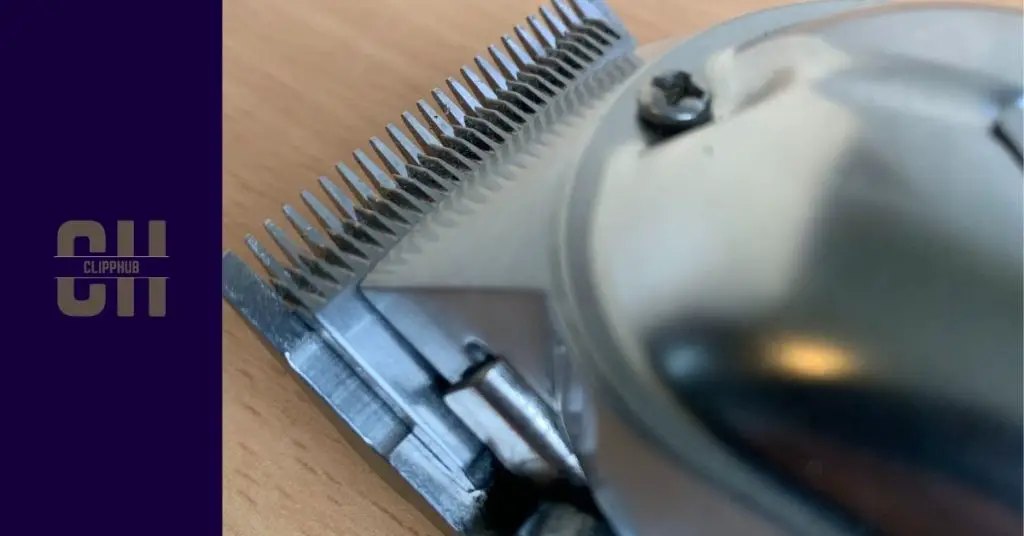
This should now take out the line completely.
1 guard lever open.
Yup, again this translates to 3mm + 1.5mm = 4mm of hair left.
Which is yup, a 1 ½ guard equivalent.
So now take this length, go up an inch (2mm), and create the next guard line which your blend out.
Then you keep the same guard on, put your lever halfway and attach the middle to the top side of that line.
Then close your blade with the 1 guard on which leaves purely 3mm of hair and you will now have a have blended that line with the lever open, half guard from the step above.
They both equal 3mm of hair left.
You should start to get the hang of this.
1 ½ guard lever open
Take this length and go up another inch to create the next guard line.
Then put the lever halfway and then close to take the line completely.
Note: – Now if you don’t have a 1 ½ guard (andis guard your can instead use a 2 guard lever closed and meet the lines together with 1 guard lever open both the same length.
2 Guard lever closed
If you did have a regular 1 ½ guard, you can now take your 2 guard – lever closed and blend that up into your 2 ½ guard of hair we set right at the very start where we took off all of the hair at the same length.
If you don’t have the 1½, instead, you can now instead use the 2-guard lever closed, then open it as you move up to the 2/ ½ guard length.
And just like that, you’ve faded a 2 ½ with a 0.
Now all that’s left to do is line up a haircut and make it look tidy.
This video gives you a full outline of the process.
Now I don’t have a liner, you can pick one up from our guide below:
Best Line Up Clippers (In Hand Reviewed Trimmers for Precise Edges)
When using your line-up clippers to line up your hairline, all you want is to keep you steady.
Press firmly and DON’T PUSH THAT HAIRLINE BACK.
This video provided you with a walkthrough of the process.
Conclusion
In this article, we went through how to fade hair for beginners at home.
In order to do this you must learn how to manipulate a lever and work with a guard to create guidelines that you slowly take out to create a blend.
If you found this article helpful. Check out other articles on Thai topics below.


