How to Use Hair Clippers (Use Clippers Like A Pro)
So you’re looking to figure out just exactly how to use hair clippers…
Well, you’re in the right place for answers.
In this guide we’ll go over:
- How to use hair clippers
- The different types of hair clippers
- Guards with clippers…
And the simple 5-step process you understand how to fade with your clippers
So, with that said, let’s get into it.
How to Use Hair Clippers
First and foremost, there are 2 different types of hair clippers.
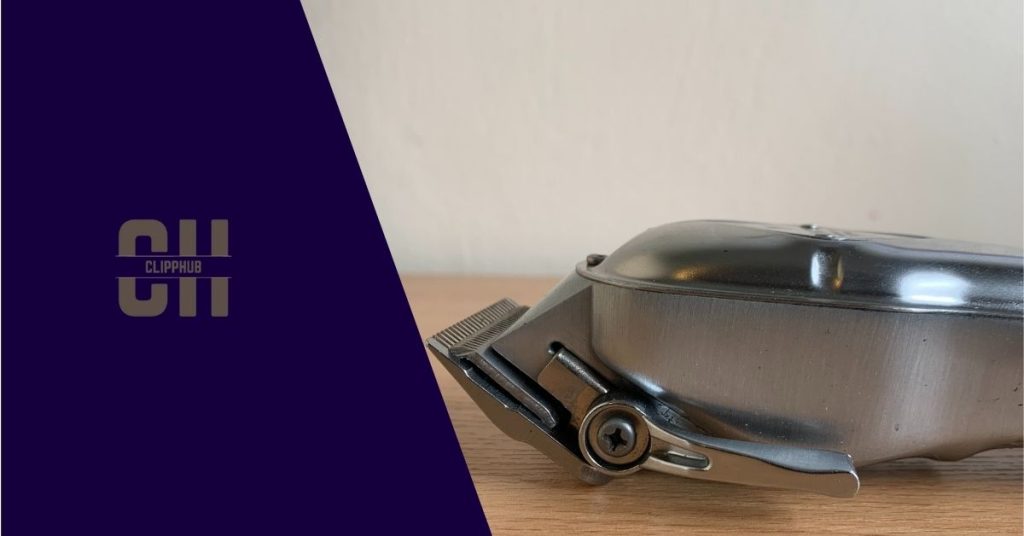
These would be a detachable blade clipper such as the Oster 76… with the blades themselves looking like this:
And an adjustable lever-based clipper:
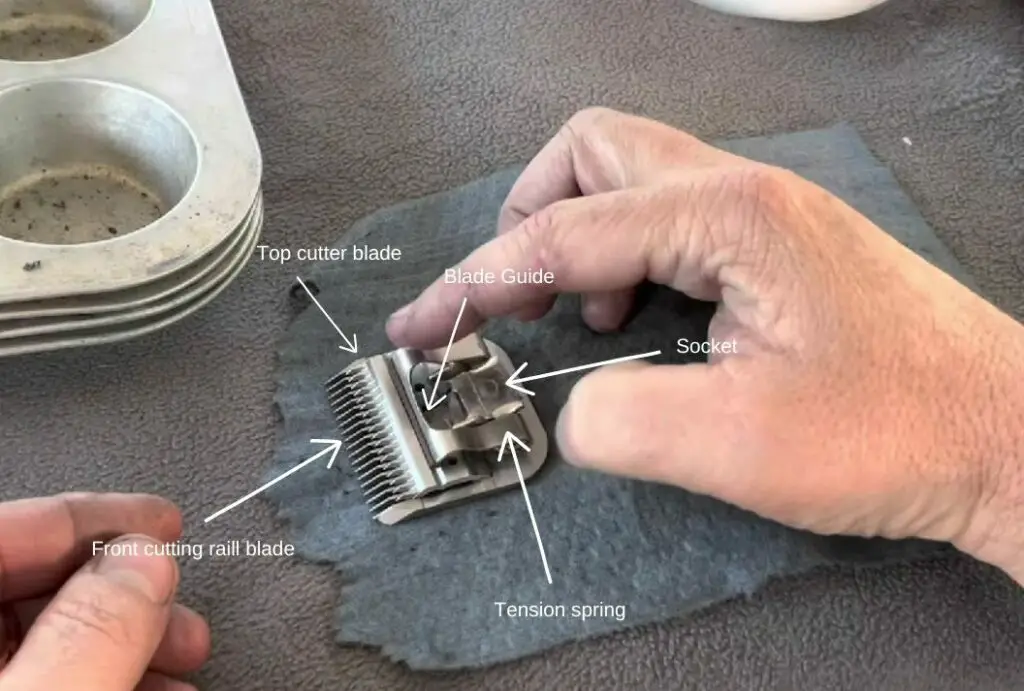
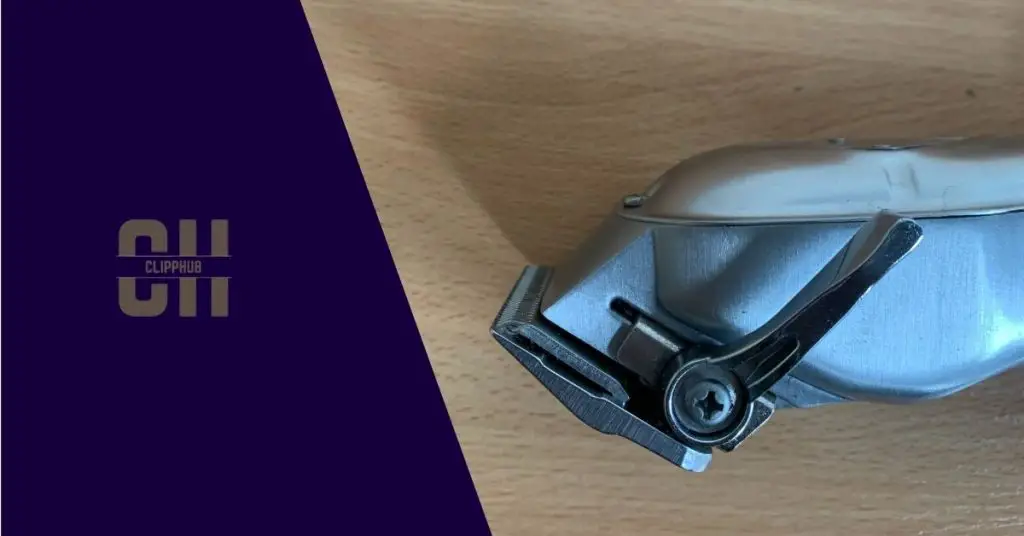
Mechanism of Detachable Blade Clippers
Detachable blade clippers work by having a blade that can be easily removed from the clipper body.
The blade is held in place by a locking mechanism that can be released with the push of a button or lever.
As shown below:
Once the blade is removed, a different blade can be attached to achieve a different length or style.
There’s a wide range to choose and each cut has a precise length. They will cut to the exact length stated on the blade. No need for adjustments to reach a length.
What you see is what you get.
So, what makes detachable blades great… and how does that affect the way you cut hair?
We talk about this next.
Advantages of Detachable Blade Clippers
One of the primary advantages of detachable blade clippers is their versatility and accuracy.
With the ability to change out blades, you can achieve a wide range of hair lengths and styles all whilst keeping consistency and precision.
Another advantage of detachable blade clippers is their durability.
Detachable blades can be made from:
- Titanium
- Stainless
- Carbon steel and more
These materials are often resistant to rust and are very sharp which improves not only the cutting performance of the blade but also its longevity.
They are also more resistant to cutting through bulk hair without being chipped or dragged.
But.. there’s a negative…
Disadvantages of Detachable Blade Clippers
While detachable blade clippers have many advantages, they also have some disadvantages to consider.
One potential drawback is that collecting the guards for these types can become very costly.
Yes, no joke. Collecting all the clipper blade sizes can be more expensive than buying a few adjustable blade hair clippers.
Another thing is, while the blades themselves are durable, in the situation where you’re taking them out of your clippers, you can hit and damage them which messes up the position of certain elements of the blade.
And because detachable blades are a little complicated unless you have a guide on how to put them back together, such as the one below… It can be difficult to fix, and you may end up having to fork out money for a new blade.
Overall, detachable blade clippers are durable and highly precise, however, they do have some potential drawbacks to consider before making a purchase.
But if you currently have a detachable blade clipper what’s its best use case?
We’ll go through that next.
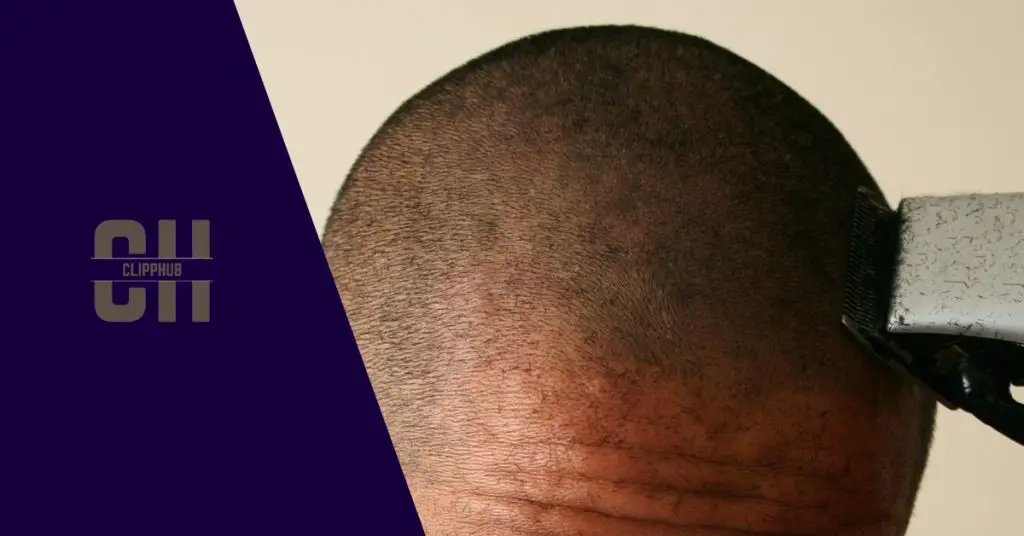
How to use a detachable blade clipper
When it comes to detachable blades, think of power, consistency, and accuracy.
With those specific traits in mind, a detachable blade clipper is the best clipper at sawing through and leaving a consistent cut across the hair.
That’s why they tend to be used by animal groomers.
But for human hair, if you like having a:
- Buzz cut
- Military cut
- Bald cut
Any style was even all round, a detachable blade clipper would give you the best results.
Now, if you have a detachable blade clipper and you’re looking for more than a consistent cut… I.e you’re after a fade, this is where it becomes a bit more tricky.
Detachable blade clippers are simple clippers, but… When it comes to transitioning between all the baldes (If you have them all), it can be difficult if you’re not very well experienced with having a detachable blade clipper.
Detachable blade clippers can are can very close, often they can cut closer than non-zero gapped lever-based clippers.
These are some of the cutting lengths of the most popular detachable clipper brands:
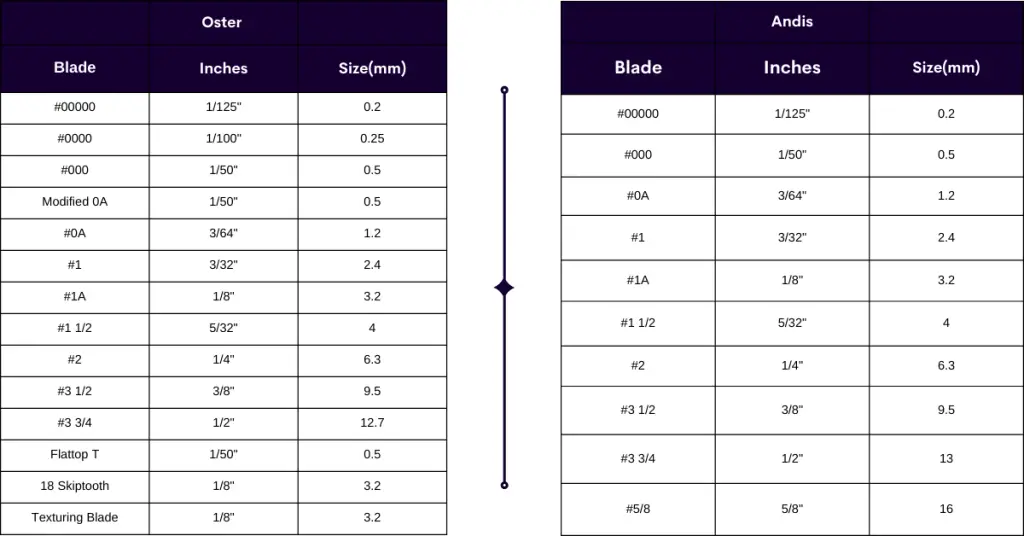
And this is how they stack up against guards:
Now, if you have detachable blade clippers, as long as you have all the blades needed and have the control and confidence, here’s how you can cut and transition between the blades to achieve a fade:
This is a more detailed, visual process:
Note, both barbers are experienced but that is what’s key.
Detachable blade clippers are not very forgiving. Meaning, due to their power blade sharpness, as a beginner, it’s very easy to accidentally cut hair that you didn’t intend on cutting.
Often as you flick out with your clippers, you can easily create new guidelines, and erasing/ fading out that line becomes even more difficult if you:
- Don’t have the right blade to fix the mistake
- Don’t have full control of your clippers
In general, while detachable blade clippers can cut to precise lengths, transitioning between these lengths to produce a good fade can be difficult…
That’s why it would be better to use a lever-based clipper for this role!
Understanding Adjustable Clippers
Adjustable/lever clippers are hair clippers that allow the user to adjust the length at which the blades are cut using a taper lever.
This type of clipper (blade) is commonly found in most of your standard clippers.
Mechanism of Adjustable Clippers
Adjustable clippers have a lever or knob that allows you to move the blade back and forth, changing the length of the cut.
When the lever is closed it cuts more hair and leaves around 0mm of hair.
When the lever is open, it cuts less hair, leaving around 1.5mm – 3mm of hair.
But by adjusting your lever you can achieve different hair lengths and styles… And that’s how you can achieve a fade.
Advantages of Adjustable Clippers
One of the main advantages of adjustable clippers is their versatility.
They are also very precise and allow alot of flexibility as you’re able to use guards meaning you have a lot of creativity so long as you know how to use your clipper blade with your guards.
This is exactly what we’ll go over next.
Using guards to cut
Now, with lever-based clippers unless you’re looking to cut your hair down to 1.5mm- 3mm (the length of hair left with your lever open). Then you’ll need to use your clipper guards.
Guards allow you to extend how much hair is being cut and if you manage to get the hang of using your lever with your guards… you’ll easily be able to create fades from it.
First, not all guards come the same, but in most cases, the lengths provided between each brand are pretty consistent.
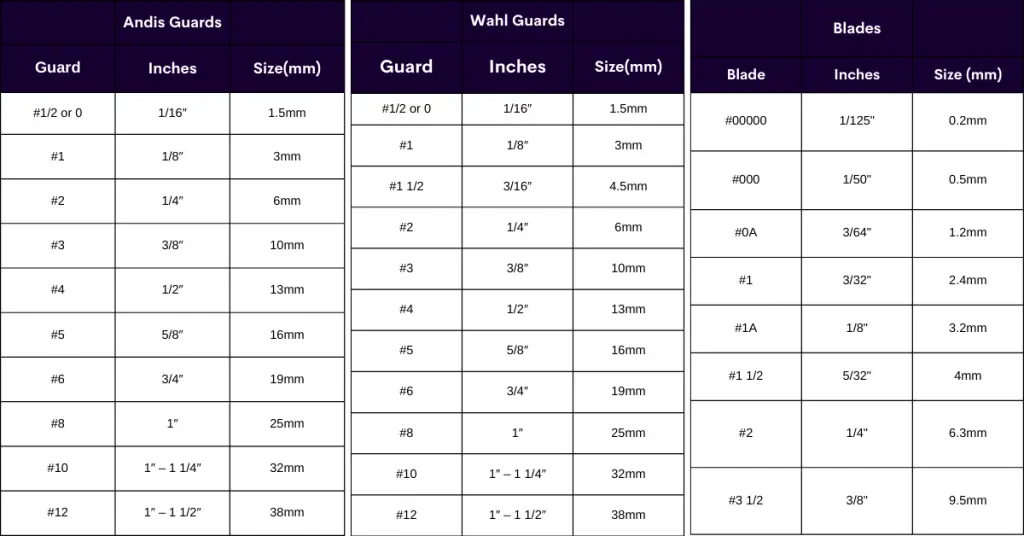
These are the guards of the 3 major brands and the length they cut to.
Wahl
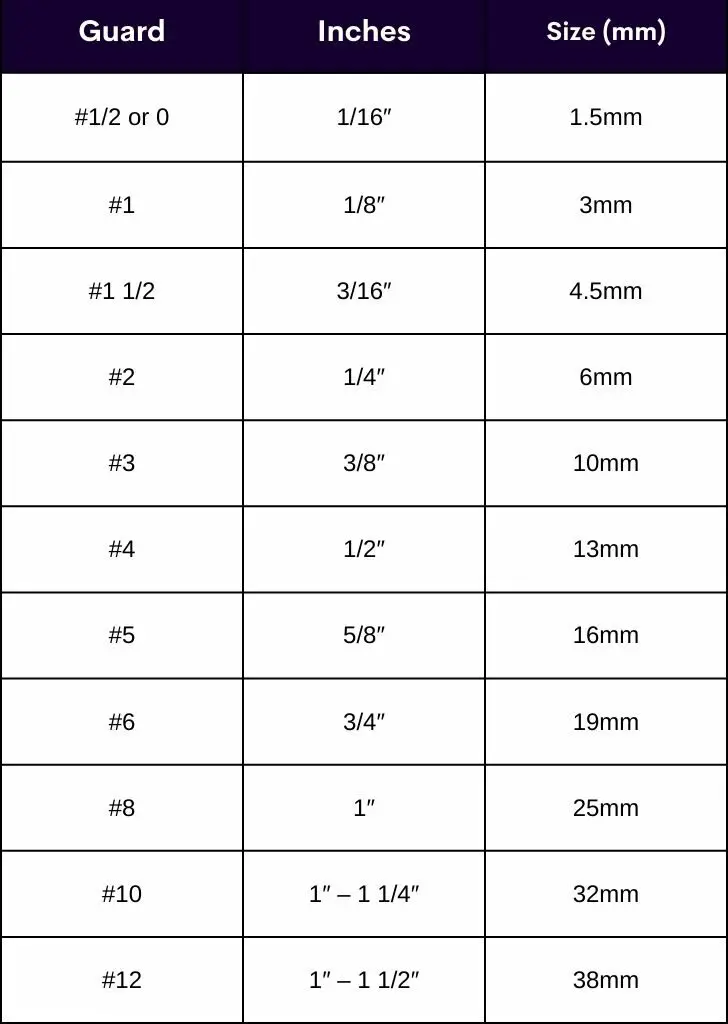
Andis
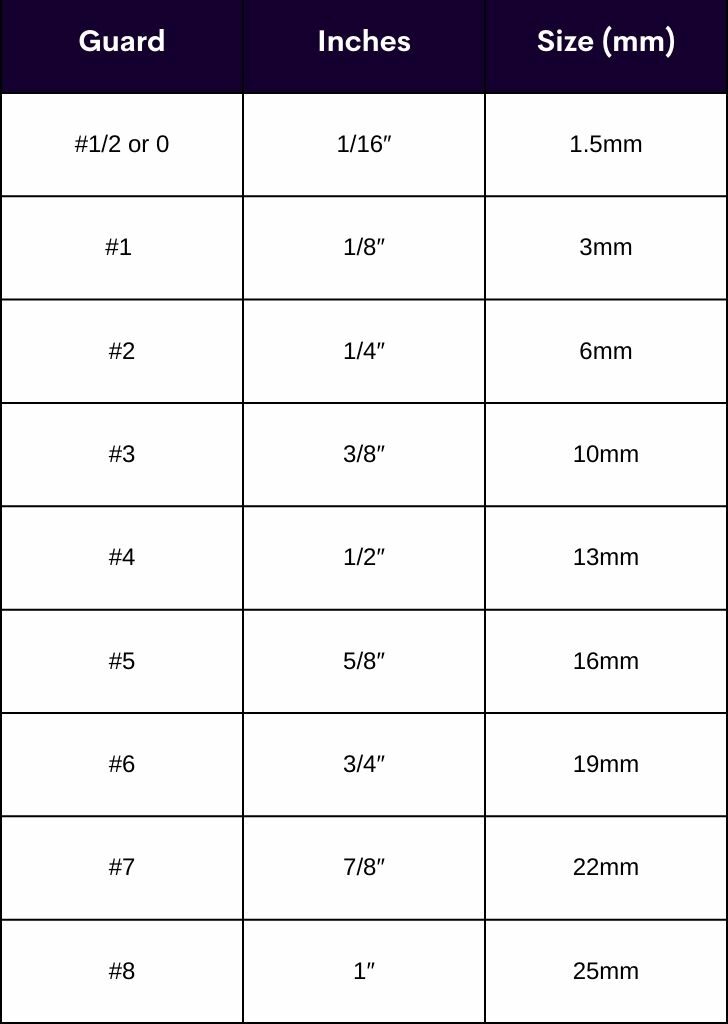
Babyliss
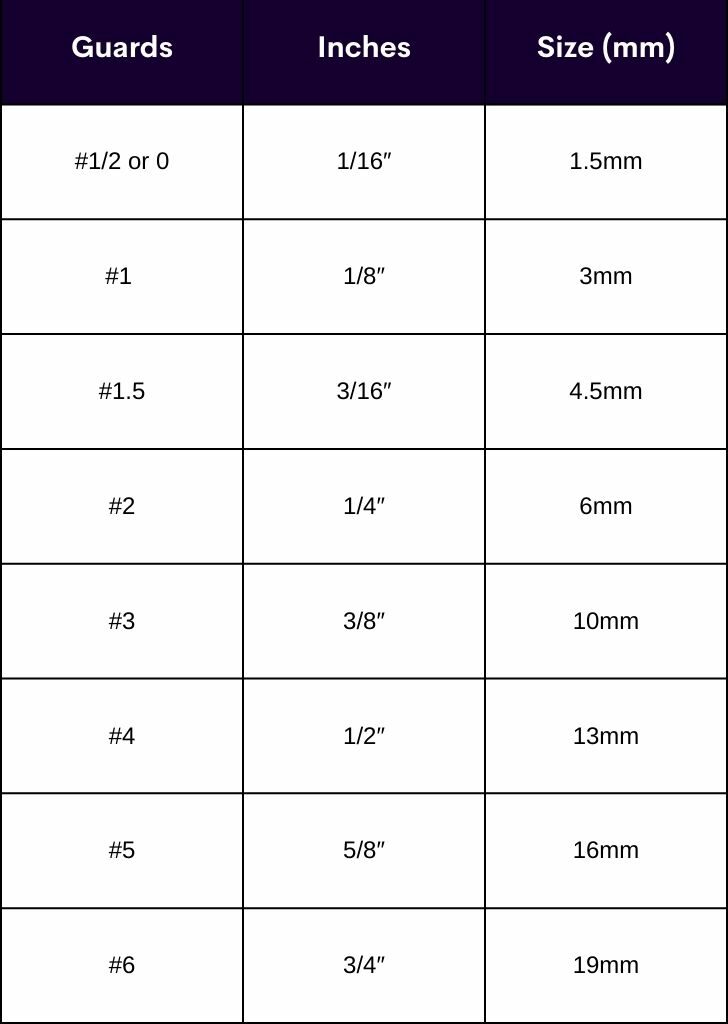
It’s best to think of the length in mm/ inches as how much hair is left.
So, you now know the lever moves to cut from virtually 0 when close and 1.5m when open.
And now you know guards leave a certain length of hair, well you can now use the two together the get merge and equal out lengths.
Here’s an example:
Let’s say you had a #1 guard with the lever closed as you open your clippers lever, it will become a 1 ½.
Similarly, if you had a #1 ½ guard, lever open, as you close the lever the overall cutting length drops down to the actual 1½ guard cutting length.
See how you can have two different guards but depending on how thou move the lever, they can come to cancel each other out?
Now I’ll explain it in terms of length.
With 1 ½ guard (4.5mm) and lever closed (0mm) = 4.5 mm of hair left.
This is the same as:
1 guard (3mm) and lever open(1.5mm) = 4.5mm of hair left which is a 1½ gaurd.
Alternatively
With a 1 ½ guard (4.5mm) lever open (1.5mm) = 6mm
Which is a 2 guard (6mm) lever closed (0mm) = 6mm
This guide has been a quick overview of understanding how your clippers work, but did you know this is only a small part of mastering your clippers?
Why not cover, cleaning, oiling, troubleshooting, and even how to use your clippers to fade using the 1-minute Clipphub cheatsheets from the New Clipper Mastery Bundle?
Fast-track your clipper mastery by grabbing them below:
Now not all clippers will cut to this length, For all I know you’ve adjusted your clippers to all sorts of lengths so you can never truly know the exact length.
But the lengths above are a good base order for understanding how the clipper lever and guards work together.
So, in essence, that’s how you can manipulate the cutting level to reach the next guard up or down.
So now you know everything about adjustable blade clippers, how could you use them to get your ideal cut?
We’ll go through that next.
How to use hair clippers on yourself
Before you start cutting your hair, you first want to make your hair washed and clean.
But make sure it’s also dry, this allows your clippers to cut through it better and leaves less mess too.
Now find somewhere with a door and free space where you can place one of these…

This is a 360 mirror that allows you to see all sides of your hair as you cut meaning you have better accuracy and control and you make fewer mistakes in the process.
It takes some time to adjust and get used to but in general, it makes the process of cutting hair very simple.
You’ll also need some liners to help you create the bald line to start with your hair.
How To Use Hair Clippers on long hair
Now let’s say you wanted to get a high top with a fade on your sides.
So what you’d do is you will get the guard with the hair length you want, slap it on your clippers, close the lever and mow down the hair at that length (Similar to a detachable blade clipper would work).
Now that the top of your hair is level, you want to now wove to the sides where you will start using guards to transition and this is where you’ll need to learn about guidelines.
These are guidelines.
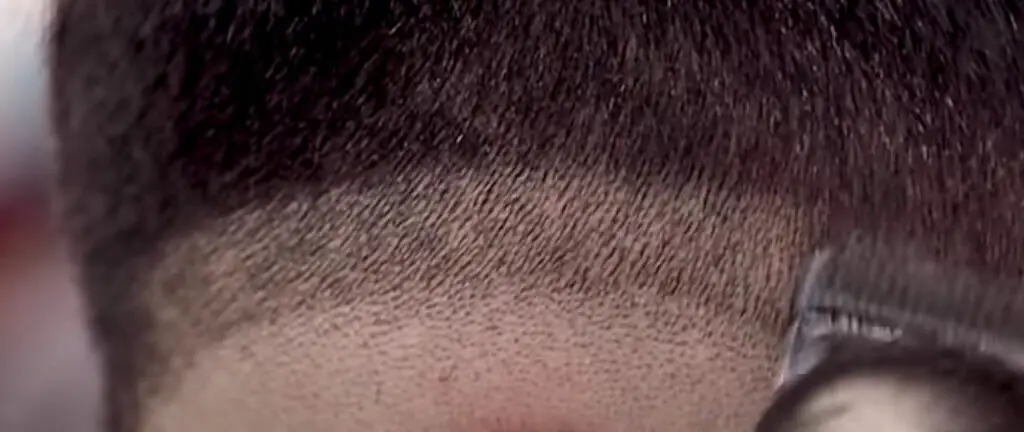
A guideline is an obvious and very harsh line created between different lengths of hair.
They are created when the length you clipper currently cutting, leaves more hair than the previous length below.
See how they steadily go up and each guideline gets thicker (has more hair)?
With guidelines, they are about an inch long (but that depends on the style), but the more space you make, the easier it is to blend… so don’t make them too cramped as you cut hair.
Starting bigger overall and longer cutting length, as you close your lever, you will gradually cut more hair.
While doing so, you should be taking out the guideline(fading it away), until you reach the bottom which will be the start of the new guideline.
So with that said, let’s get into how you can fade at home.
How To Use Hair Clippers To Fade
If you’re a visual learner, I go through the process of how to fade on my channel below:
But if you like what you reading so far, just carry on reading.
Let’s say you did mow the top of your hair to a #2 guard level and you now wanted to fade down the side of your hair… How would that work?
We go through this now.
Each line will act as a base from which you substitute the previous guard for a new guard which will cut to the same length and have the opportunity to decrease in length as you close the lever, which means you cut more hair, which levels you with a fade as you gradually go down a guideline.
Now as you go through each step, remember to keep brushing so you can better see each fade line as you create them.
2 guard lever open
So, get your 2 guards and open up the lever. This should give leave around 8mm of hair.
Take this and go over all the sides of your hair.
This should give an even flatter surface to work with.
Now, we can start the fading.
But first, you must set your first low guideline with your trimmers/line-up clipper.
Trimmer – no guard
The first step is to use the balders/trimmers/line-up clipper to set in the bald guidelines = 0 mm for the taper
Get your trimmer and set a line at the bottom of your hair go as down as you can as this will virtually cut all your hair off and will be the bottom part of your blend.
Set your clipper lever to open – no guard
The next step is to use the clippers with the lever fully open to set in the next guideline slightly further up about 1 inch.
You’ll notice as you do this there’s a slight difference between the guideline you set with your trimmer and the line you now created with your clippers ‘open’
You are leaving 1.5mm worth of hair, you’ll fade the two together next.
Set your clipper lever to midway – no guard
Now take your lever and set it to midway(that’s halfway between ‘open’ and ‘closed’).
Take your clippers and cut from the line you set with your trimmer.
Move your hand with delicate flicks and don’t go up the line you set with your lever fully ‘open’.
Now if you take your time and your blend well enough, you’ve blended the first part of your hair.
When you reach the bottom of that guideline, you should now have your lever fully closed which as we said earlier, is about 0-0.25mm depending on the clipper.
The length of hair left is enough for you to blend.
The lever is open- no guard line you made, should now be completely gone.(Faded)
And if you take your time and follow the process slowly, you should now have your first fade.
Success!!
(If you’re feeling confident, you can move the lever to be more closed or open and you can blend further) – It may not even be needed if you like the current look.
Now let’s go up.
Lever Open + Half Guard
Lever open + half guard is the same as 1.5mm + 1.5mm = 3mm which is basically a 1 guard now.
Go up an inch once more to create the new guideline which you’ll blend out.
Now, move the lever to halfway open.
Now you’re going to take out the lever open, no guard line you created.
This will now cut slightly more hair so slick at the line and it should start going away.
Now as you move down, by the time you reach that lever open line, your clipper should now be on a half guard, lever closed – 1.5mm + 0 mm which is the same as a lever open.
So when you reach that line you cutting the same length off your hair but you’ve now taken out a line of hair and done a fade.
Neat how it works isn’t it?
If you have your lever closed with any guard and you’re cutting the top side of your hair, you’ll be cutting more hair than you like and that’s how you botch a fade.
So Yh.. keep that in mind.
Now; this 0.5 cutting length is sometimes tricky and doesn’t always want to blend clean so what you could do is an attack from the other side.
You could remove the guard, take the corner of your clippers, open your level, and use the corner of the blade to attack the 0.5mm line.
Remember, there is the same length.

This should now take out the line completely.
1 guard lever open.
Yup, again this translates to 3mm + 1.5mm = 4mm of hair left.
Which is yup, a 1 ½ guard equivalent.
So now take this length, go up an inch (2mm), and create the next guard line which your blend out.
Then you keep the same guard on, put your lever halfway and attach the middle to the top side of that line.
Then close your blade with the 1 guard on which leaves purely 3mm of hair and you will now have a have blended that line with the lever open, half guard from the step above.
They both equal 3mm of hair left.
You should start to get the hang of this.
1 ½ guard lever open
Take this length and go up another inch to create the next guard line.
Then put the lever halfway and then close to take the line completely.
Note: – Now if you don’t have a 1 ½ guard (andis guard your can instead use a 2 guard lever closed and meet the lines together with 1 guard lever open both the same length.
2 Guard lever closed
If you did have a regular 1 ½ guard, you can now take your 2 guard – lever closed and blend that up into your 2 ½ guard of hair we set right at the very start where we took off all of the hair at the same length.
If you don’t have the 1½, instead, you can now instead use the 2-guard lever closed, then open it as you move up to the 2/ ½ guard length.
And just like that, you’ve faded a 2 ½ with a 0.
All done!
This video explains the visual process of fading from a #2 guard hair level down to a 0.
As shown in the video, you want to keep this entire fading process consistent all around your head.
So start with one side of your head then move to the other side, and finally end on the back as it’s the most tricky and you may need to warm up into it.
But apart from that, that’s all you need to know on how to use hair clippers for beginners.
Now all you have to line up your hairline… that’s for another guide.
Conclusion
In this article, we went through how to use a hair clipper.
When using clippers, all you need are the id the length you cutting to, and how to transition between guards.
You must be steady in how you cut and take your time to create the best-looking cuts.
If you found this article helpful, check out other articles on this topic below.