Our puppers need to look their best.
Sometimes that comes with a clean cut, but to get this, we need sharp hair clippers.
But after cutting numerous coats, they become blunt, so how do we get them back to their best?
In this article, we will go through the process of how to sharpen dog clipper blades (and I will give you some extra tips and tricks).
So with that said, let’s get into it.
How To Sharpen Dog Clipper Blades
This is a quick summary of how to sharpen dog clipper blades (detachable)
Do the last 2 steps for both blades.
This is a brief outline of how to sharpen detachable Andis clipper blades.
Later on in this article, I’ll go through this process in more detail.
But what if you don’t have detachable clipper blades?
If your clippers have a lever, then you just have regular clippers.
For those types of blades, check out ones two articles below on how to sharpen those blades with sandpaper or a grindstone.
How To Sharpen hair clippers with sandpaper (Full Guide)
How to Sharpen Clipper Blades With a Stone (Step-By-Step)
Detachable clipper blades are the type of blades your most like to find, Especially Andis clipper blades.
They’re pricy and that’s why should look to sharpen your clipper blades but only when necessary.
We’ll talk about this next.
Dog Clipper Blade Sharpening
So.. Can You Sharpen Dog Clippers? Yes. But..
Your blades sharpened 3-5 times before they will begin to wear out. Avoid constantly sharpening your clippers at any convenience.
Aim to sharpen your blades well, one time, rather than constantly sharpening them
If you sharpen your trimmers too much or hone them unnecessarily, it can cause the blades to become dull.
Therefore, it’s important to avoid damaging the blades by sharpening them excessively.
Signs to not sharpen Hair clippers
If your clippers are dirty, avoid sharpening them.
People believe that simply because their blades are a little dirty, they need to be sharpened.
That is not the situation. Contrary to popular belief, a dull blade is not always unclean. Sure, both can impact performance, but the key is in how you address the issue.
If you simply sharpen them at the first sign of trouble, all you’re really doing is unnecessarily thinning your blade.
If any of the true signs below arise when you are cleaning and maintaining your clippers, it is justified for you to sharpen your blades.
The Type of Dog clipper blades
As I mentioned previously, the number on a dog clipper blade is important and cannot be ignored.
Having a wide range of blade sizes allows flexibility when cutting dog different dog coats as well as making a dog look nicer and feel comfortable.
However different blades have different properties and sometimes you can confuse your blade to be dull when in fact, you may just need a new type of blade for that certain breed of dog.
Blades 3-7 tend to be best or bigger coats. These types of blades do not cut fur as deeply and are used on furry dogs. These types of blades tend to leave around 13mm of hair.
Long clip blades work best on these types furrier of dogs however when you transition to a dog with a shorter coat and you use 3-7 blades, it will not cut as well as you hope it would.
Blades 9,10,15,30,40,50 are precision cutting blades that are used for fine cutting and detailing, and opposite to the smaller blade, which does not work as well as furrier dog coats.
Short clip blades better known as skip tooth and fine tooth blades, they can leave as close to 0.2mm of hair. Blades 40,50 can be used surgically and can cut as close to 0.1 mm if they are zero-gaped.
This is why it is important you know what blade you are using for which type of dog and adjust your expectations from there.
Don’t just assume because you’re not getting the type of cut you want from your blades, it means that isn’t sharp enough.
Always refer to the guide to better understand which blade to use
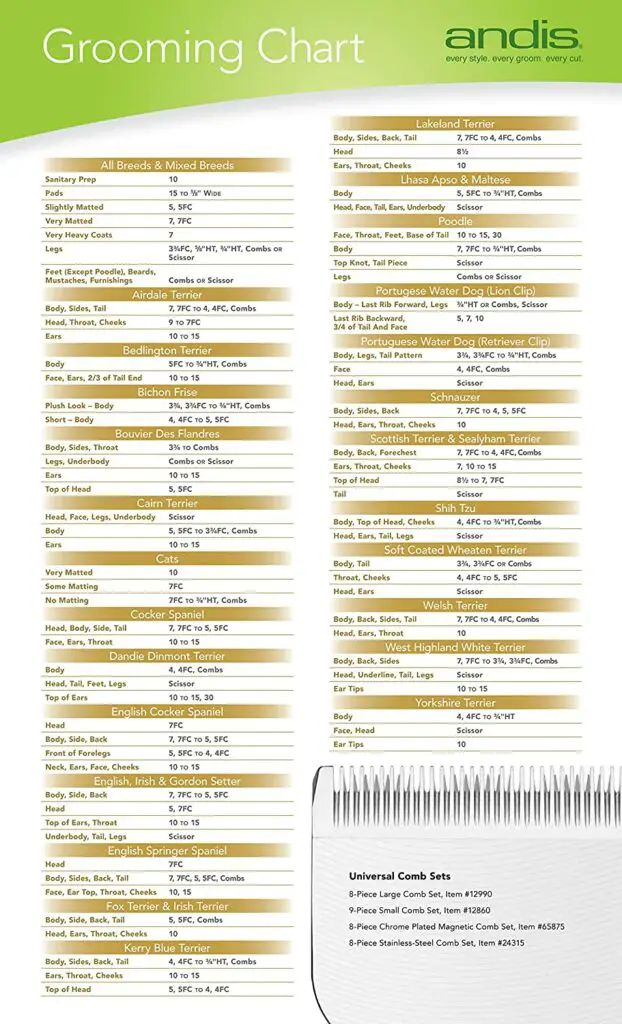
When To Sharpen Your Clippers
Hair pulling is a clear sign your blades need sharpening. Hair pulling occurs when your blades are simply not sharp enough to easily cut your dog’s coat.
You may even spot a poor-performing blade long before it gets to this stage. If you find yourself having to put extra force into cutting your dog’s coat, that is a sign of a dull blade.
If you find yourself constantly going over the same patch of hair multiple times and still struggling to cut that is another sign your blades are dull.
Lastly, if you notice your blades are holding onto hair you drag cut with your clippers, that is classic hair pulling and the final sign you need.
You will tend to see a negative reaction from your dog if your clippers pull hair. It can be uncomfortable and painful. Clipper blades are made to seamlessly cut animals without difficulty, so if your blades are pulling hair, They need to be fixed quickly.
It is important to know whether clippers need sharpening or not, oversharpening and blade can aid in wearing blades out sooner.
Detachable Blade Replacement
But, sometimes there are signs that your removable blades need to be replaced.
Which are:
Sharp blades
It may indicate that the blade needs to be sharpened if you run your finger over it and it feels pretty rough or gritty.
You could need to replace your clippers’ blades or have them professionally sharpened if it’s too abrasive or even cut you.
Chips
Your hair clippers might need to be replaced if you can see that the blades are dull or if there are obvious nicks or chips on the blade.
It doesn’t mean you can’t perform them, but it will be harder, and you might need the help of an expert.
Rusted Clipper Blades
Dog blades that rust aren’t uncommon, we use blades on all sorts of dog coats, Dirty, wet, oily it does not matter, we have a job to do.
However, over time our blades can feel the effect of this and rust, especially if we do not store them correctly to prevent rusting.
So how should you approach sharpening your rusted clipper blade?
If your blades are rusty, you will certainly know, they tend to perform horribly. To fully check if your blades are rusty, always deep clean and sterilize.
Read the clipphub guide on how to clean rusty hair clippers below:
How to clean rusty hair clippers (DIY Cleaning Solutions)
Once done have a proper look at your blade, If you notice your clippers still have dark rusting as shown below
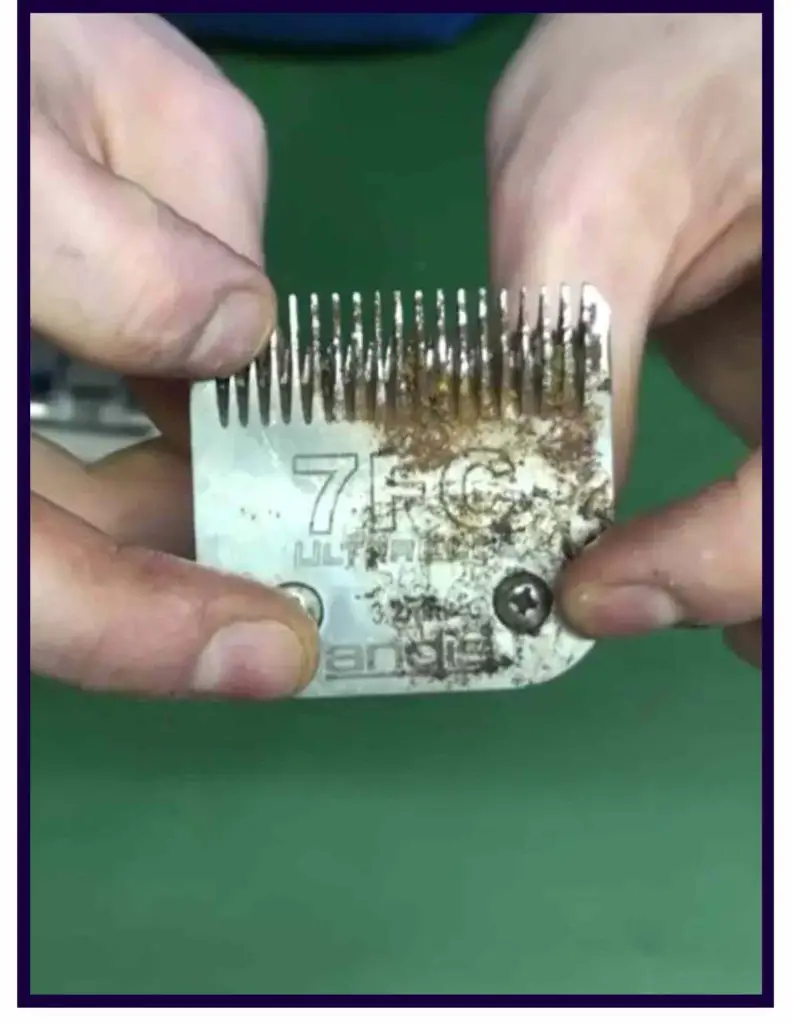
You should look to get your blades sharpened professionally or replace the blade altogether.
Rusted blades are very fragile. While it is possible for you to sharpen your blades and possibly remove the rust, that kind of work requires a lot of skill
If you are not too experienced in sharpening clipper blades you run the risk of breaking/ snapping your blade in the process.
Replacement
Dog clipper blades are not all made the same. Regardless of the brand, whether it’s Wahl, Andis, or Oster, every blade on a clipper is different.
You need to be aware of the blade on your clippers and what effect they have when sheering your dog.
Every blade has a number. The number on the blade represents how sharp the blade is, this applies to all hair clipper brands.
I have a simple phrase to remember which blade the property of a blade, depending on its number and it goes:
‘The higher the number the number, the shorter the clip’
This saying is true no matter the brand, If the blade is an example a 7, it will cut shorter than a blade that is a 5. And a 10-blade will cut shorter than a 7-blade.
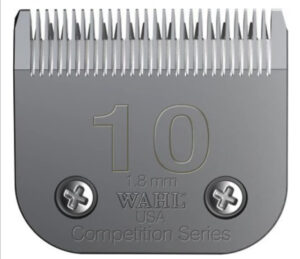
Not sure what blade you have, you can find the number on the outside of the front cutting rail blade as shown below:
If you are unsure of which blade to use on your dog, I provide a guide below on the best blade for each breed of dog:

Here are some blades from the most popular brands:
How To Sharpen Pet Clipper Blades
You need to make sure your detachable blades actually need sharpening as in these steps, you’ll be:
- Changing the tension on your blade
- Changing the alignment of your blade
Both of these can lead to a major decrease in the performance of your clippers regardless of how sharp they are.
However that you should not put off if you have clippers need sharpening. I will guide you through the process so you can avoid these problems.
So, how exactly do you take apart detachable dog clipper blades? Don’t worry I talk about this next.
Sharpening Clipper Blades
Yes, you can sharpen your dog clipper blades but you must know how your blade fits inside your clipper. Having this understanding helps with re-assembly after sharpening.
Detachable blades
Before you look to get into the steps you need to understand detachable blades and how they work as they can be complicated, especially for beginners.
Ivan Zoot explains the process well.
Let’s go deeper into certain blade parts.
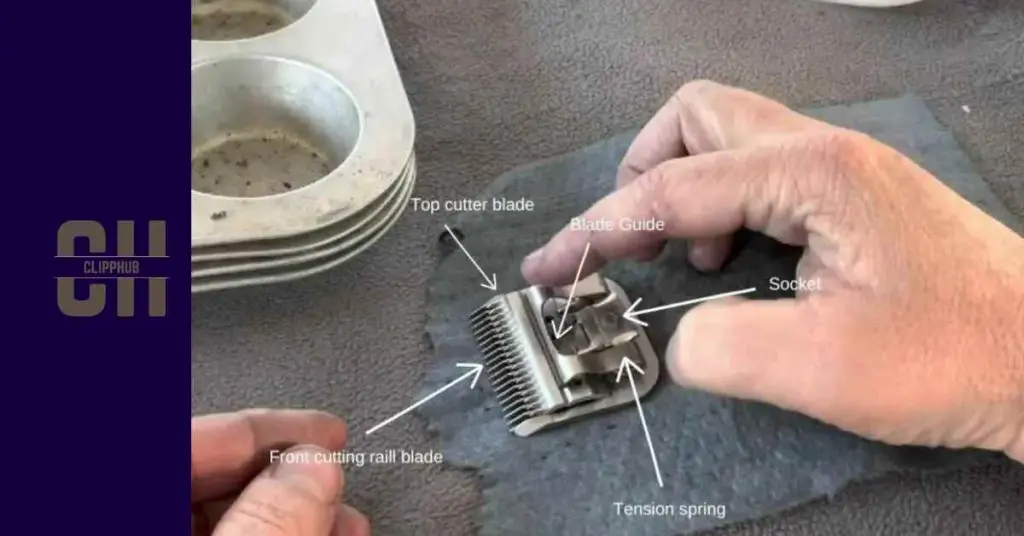
Detachable dog clipper blades are propped up and held together by a tension spring. This has to be removed along with the socket, and blade guide.

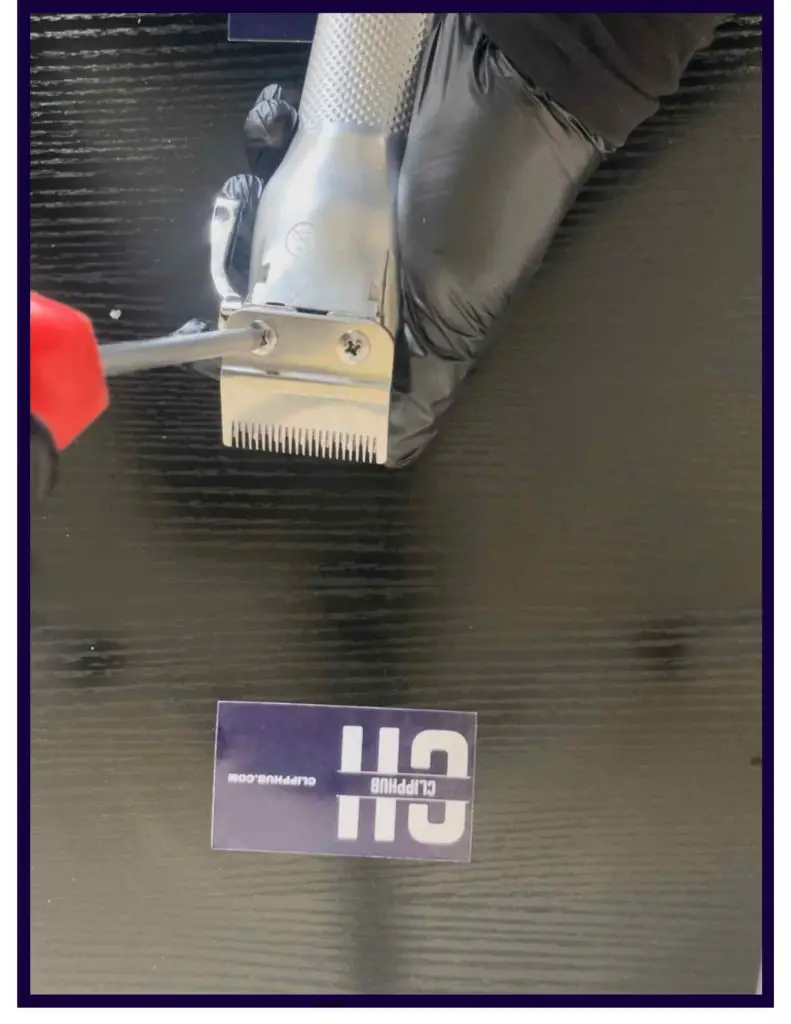
To get to the blades themselves, you’ll need to remove and unscrew the screw bolt holding the socket to the top cutter. As shown below.
Tools
Below I have a quick list of tools you will need to begin sharpening your clippers correctly.
- A small hard bristle brush ( It can be a toothbrush)
- A grindstone/ Sharpening stone ( 3000 – 8000 grit ideally)
- A screwdriver
- Marker/ Highlighter
- Cloth
- Warm Water
- Magnet (optional)
- A scale
- Hair clipper oil
Sharpen Dog Clippers
Let’s delve into this in more detail.
Step 1: Remove your hair clipper blades.
Unscrew the two bolts holding your hair clipper blades together with your screwdriver.
As I mentioned earlier, it all depends on the kind of clipper you have.
Spend some time on this step and take care when removing the blades. Don’t hit or disturb the other parts of your hair clipper.
When putting the hair clipper blade back together, additional components must be kept in a secure location.
Step 2: Clean
Always clean your clippers (but you should’ve done that by now) before you sharpen them.
Dirty clippers may be the reason your blades are not performing well, so deep clean your clippers, check how they perform, and then look to sharpen.
Using your brush make sure to brush away any dirt and hair that is on your clipper blades. Then you water the blades and dry them off with a cloth.
Step 3:
Place your grindstone on a flat surface.
This is key as you want to avoid sharpening your blade at an angle, it can damage the teeth and ruin your blades overall.
Using a highlighter/ marker, mark the inside of both blades. These are the sides where both blades touch, this interior will be the side of the blade you will be sharpening. Using a marker maker helps to indicate when your blade is fully sharpened and to make sure you don’t overdo it
Step 4: Blade sharpening
Place your blade on the grindstone flat, making sure it is perpendicular to the stone.
Make sure the blade’s interior is facing the stone.
Holding your blade firmly this time, sweep it across the grindstone while maintaining its straightness. On the stone, swing your sword back and forth.
around ten times ( with a figure of 8 motion.)
If you are having trouble keeping your grip, you can use a magnet to hold your hair clipper blade or a little water to lubricate your grindstone.
Check your blade after these ten passes. When compared to before, you should notice that the marker has disappeared and your blade is extremely shiny.
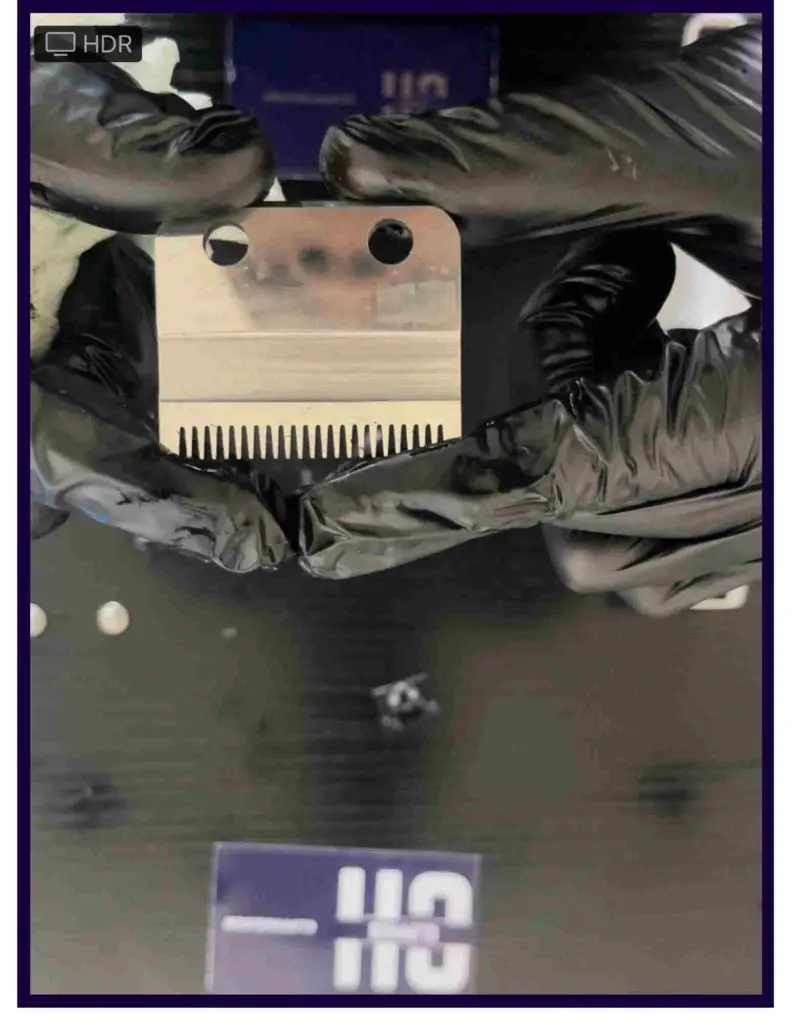
Step 3: Wipe
Once you are satisfied with the look and sharpness of your blade, you can put it back together.
But first, use a cloth to wipe down your blades, just to get rid of any dust, and add some extra shine to your blades.
Just like that, you have new, sharp blades ready to cut.
However this next step is overlooked and if you want your blades to last a long time, you cannot avoid this…
Step 5: Oil
While your Andis Clipper blade is in the open, there is no better time to oil them.
Using hair clipper oil or an alternative such as baby oil or mineral oil, run a line of oil across the inside of the top cutting rail teeth.
The two drops on either side of the sole plate.
Then put a drop of oil on the teeth of the cutting blade.
Or alternatively, you could put your blades back together and then oil them as shown below:
Here are some hair clipper oils if you lack some:
Now putting the blade back together is an important process.
Although old, this video shows how you can do it:
And just like that, your dog clippers are now sharpened.
Conclusion
After reading this post, you ought to understand How To Sharpen Dog Clipper Blades.
Always check whether your blades require honing before removing them to avoid the risk
of adjusting the blade’s tension
Alter the blade’s orientation.
FAQ
How often should I sharpen dog clipper blades?
What is the best way to sharpen dog clipper blades?
Can I sharpen dog clipper blades at home or should I take them to a professional?
If you have found this article helpful why not check out the article on how to sharpen pet clippers?

